Water Cycle
For Grade 2
Demonstration and experiment shows visually how the water cycle is driven by the sun and understanding of the 4 stages that it goes through: evaporation, condensation, precipitation, and collection (runoff).
Safety Considerations
- Provide students with safety goggles when spraying hairspray. During the initial demonstration, explain and model proper use by checking the nozzle position and ensuring it is directed into the jar and away from faces and eyes.
- When pouring hot water into the jars, ensure students are a safe distance from the table to prevent burns in case of spills. Alternatively, pre-pour the hot water before students approach the workspace.
- Demonstrate how to gently stir the food colouring into the jar to avoid splashing.
- Keep glass jars away from the edges of tables to prevent them from falling and breaking.
Materials Needed
- Video to start to engage students (movement break by GoNoodle) https://www.youtube.com/watch?v=KM-59ljA4Bs&list=RDKM-59ljA4Bs&start_radio=1
- Jar (2 jars if demonstrating a second time with students)
- Kettle with hot water
- Blue food colouring (for visual representation of water)
- Spoon or stir stick (to stir water and food colouring)
- Cover for Jar (such as a plate or bowl: needs to fully cover jar opening)
- Ice (goes on or in bowl cover)
- Hairspray (to represent dust particles)
- Safety glasses for students for spraying hairspray
- Book-Master Hamster Super Science- Weather
Demonstration
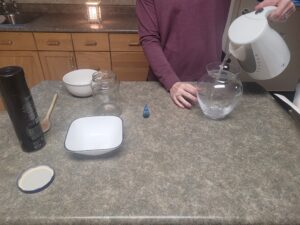
- Lay out all the materials in order where students can see: additional jar, hot water, blue food coloring, ice, hairspray, and safety glasses.
- Have students form a semi-circle around the table.
- Ask a few students to assist with the experiment and have them wear safety goggles.
- Pour hot water into the jar (about halfway).
- Add a few drops of blue food coloring and stir. (Student assistance)
- Now that we have our liquid ready, the sun is warming the water. What is happening to the water and what is the process called? (evaporation)
- The jar is steaming. Hot air rises, and the water is turning into a gas just like before.
- Now we add the hairspray to represent the dust particles.
- Allow student to spray
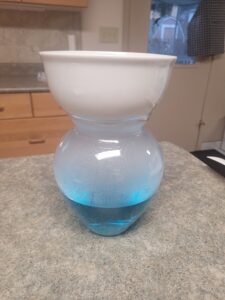
- Another student put a cover (plate) that is holding the ice, on top of the jar.
- When the water droplets form into a cloud, what is this process called? (condensation)
- As the cloud collects more and more droplets, it gets heavier. Why do you think this happens? What happens when it can’t hold any more? (depending on temperature- it can rain, snow, hail)
- Where does the rain go? (back to the bodies of water-collection)
- Can you tell me what will happen next?
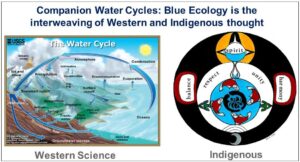
- Many Indigenous First Peoples believe that water is alive and that it takes care of us. Because water gives us life, people have a responsibility to take care of water in return. When you go home tonight, I want you to think of this question and we will talk about it tomorrow “Indigenous Peoples teach that because water always comes back, we must keep it clean for the future. If water keeps cycling and coming back to us, what happens if we pollute it or waste it?”
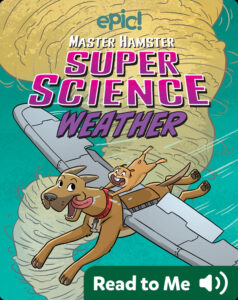 This book is a great introduction to the Water Cycle and understanding in a fun visual way
Explanation of the Theory or Science Underpinning the Demonstration
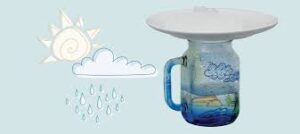 The “Water Cycle in a Jar” is a small, closed model that shows how water moves around the Earth. It demonstrates how water changes between liquid and gas in a continuous loop. Heat makes the water evaporate into vapor, and when the vapor cools, it condenses back into liquid, sometimes forming drops like tiny rain. This simple experiment helps us see how evaporation, condensation, precipitation and collection work, and how energy from heat drives the water cycle.
Using the “Water Cycle in a Jar” demonstration allows students to learn in more than one way. Visuals help them see the process, while real-life analogies like a warm shower creating steam or a cotton ball collecting water make the ideas easier to relate to. Hands-on experience gives students a deeper understanding, especially when they follow the Predict–Observe–Explain model. By conducting the experiment themselves, students can gather their own evidence to test their predictions through seeing the Water Cycle in action. This reinforces learning and critical thinking.
Reflection
Teaching the water cycle through a hands-on demonstration was an engaging and valuable experience for me. I taught this lesson to my cohort, who pretended to be Grade 2 students, which allowed me to practice explaining scientific concepts in a clear, simple, and age-appropriate way. Using the “Water Cycle in a Jar” experiment helped turn a big science idea into something concrete and easy to understand.
Starting the lesson with a GoNoodle video was effective in capturing attention and preparing learners for the activity. During the demonstration, my cohort actively participated adding food colouring, and spraying hairspray while wearing safety goggles. This helped me see how involving students in demonstrations can increase engagement and excitement. The visible changes in the jar, such as steam rising and water droplets forming, clearly showed evaporation and condensation, and reinforced the four stages of the water cycle: evaporation, condensation, precipitation, and collection. Having the video at the beginning, helped students remember the order. Even during the discussion/question part of the demonstration. They sang the song and I heard them after my demonstration, still singing the song.
Safety considerations were an important part of the lesson. I practiced modelling proper use of materials, including handling hot water, glass jars, and hairspray. This experience helped me understand the importance of clear instructions and thoughtful classroom management during science experiments.
I incorporated a picture book into the demonstration and put it on the SmartBoard for everyone to see, as I believe at a Grade 2 level, picture books are a good visual example of what is being taught.
I also valued the opportunity to include Indigenous perspectives about water. Discussing the idea that water is alive and must be respected encouraged meaningful reflection about our responsibility to protect water. Ending the lesson with a reflective question allowed students to think beyond the experiment and connect learning to real life.
Overall, this experience helped build my confidence in teaching science through demonstrations. Practicing this lesson with my cohort gave me a better understanding of pacing, questioning, and student engagement. I am looking forward to doing science demonstrations in front of students during my practicum and continuing to develop my skills as a science educator.